Rigging a Cut Out takes a lot of work to set it up before you can animate it. I've tried to go through this process step by step. I have also included some helpful tutorials explaining this process and will add my own soon.
If you have any problems setting up your character, document what happened and let me know. Here's something that happened to me and a solution to it.
The goal is to design a biped human character in a 3/4 pose, making sure the feet are both facing the same direction. Similar to the posed characters below. Simple is Better.
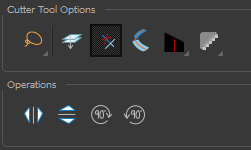
 tool, its properties and options appear in the Tool Properties view.

Parent the Head first.
If you are set up correctly, your head should rotate as if its on top of the neck. Rotate it to check the motion, you will notice that the face parts do not move with the Head. They need to be Parented to the Head. When the Parent moves, the children (Face Features) move with it. Here's how to parent the face parts to the head.
If Nudging does not work, you have to place the cursor in the Camera view, then hold down the Option button and press the arrow down V on keyboard.
If it still doesn't work, you can do this instead. You will need to click on the + on each Face layer to open the position control. All the positions will be at 0. You will need to enter 0.001 on the Position: Pos z layer.
Doing this will bring the face part forward in front of the Head.
If you have any problems setting up your character, document what happened and let me know. Here's something that happened to me and a solution to it.
The goal is to design a biped human character in a 3/4 pose, making sure the feet are both facing the same direction. Similar to the posed characters below. Simple is Better.
Use the Pencil tool to outline your cleanup drawings of each part of the character. Use the erase tool or cutter tool to clean up the lines before adding color.
Cutter Tool Options
When you select the Cutter
Paint the color into your body part shapes by using paint bucket. If a drawing does not fill, there may be a space in your drawing, you can use the Gap tool to fill in the gap.
Once everything is cleaned up and painted, turn on the Transform dotted square and the Rotate tool at the top,near the display all window, next to Translate icon.
Your selected body part is highlighted and you should see a blue pivot point with a yellow arrow sticking out of it. Click on the pivot with mouse, holding it down and moving the pivot point to the correct place.
Pivot Placement
To save time, when you select the drawing layer name it the body part name. Here's a sample list of naming the parts. Short and Simple, please do not get clever naming these parts like: My_Mans_FunkyHead.
If you do this just to get a laugh, you will have to rename all the layers again.
All layers need to have the same naming convention so all animators are using the same thing. Its a group effort, get use to it.
Here are our naming conventions for this rig.
Head **
- Eyes (white eyeballs) Separate drawings for blinks
- Pupils
- Mouth Separate drawings for mouth poses for lip sync
- Hair If your Character has hair, this will be placed behind the head.
- ** (Ears and Nose) can be included on the head, this all depends on your design)
Body (includes neck stub)
- ** Butt: (More realistic designs will need this to cover the legs as they rotate.)
Also depending on which way you character will be facing, you can use Lt = Left or Rt = Right
When you have more rigs like front and flipped 3/5, etc. you will want to Change Left or Right to Front and Back. This refers to what Arm or Leg is facing in front of your character and which is in Back.
Lt_Arm
Lt_Hand
Rt_Arm
Lt_Hand
The hand can have many more hand positions which you can change during your animation. Neutral hand, Fist hand, Pointing hand, cupped shaped hand, hand with fingers splayed out, thumbs up hand, etc.
Each hand has the same amount of separate hand choices.
Legs
Legs
Lt_Leg
Rt_Leg
Make sure feet or shoes and sitting flat on the ground and pointing in same direction. Take a look at the drawing below.
Once all the pivot points are moved to the right place, its time to Parent the Parts!
Parent the Head first.
- Click on Harmony Premium and click on Preferences
- Under General, click on the button: Focus on Mouse Enter.
If you are set up correctly, your head should rotate as if its on top of the neck. Rotate it to check the motion, you will notice that the face parts do not move with the Head. They need to be Parented to the Head. When the Parent moves, the children (Face Features) move with it. Here's how to parent the face parts to the head.
Make sure you have all the face parts ready to go, you can't add new drawings later. Add an eye blink and different mouth positions for lip sync.
Turn on the Transform dotted box on tool bar. Select all Face/Head parts in the Layers list, click and move the selected group to land onto the Head layer. Unclick and group is pasted below the Head layer.
Harmony pops the group under the Head layer and all the parts should be listed there, but the drawing is behind the head itself. You must use "Nudging" to bring the Face parts to the front of the Head. Here's where the "Focus on Mouse Enter" comes into play.
Harmony pops the group under the Head layer and all the parts should be listed there, but the drawing is behind the head itself. You must use "Nudging" to bring the Face parts to the front of the Head. Here's where the "Focus on Mouse Enter" comes into play.
To bring the Face features forward, you need to use something called "Nudging".
Select the face feature layers as a group, make sure the Transform dotted square tool is on. Move the cursor into yjr Camera (Stage) view. On a Mac hold down the Option button as you click the arrow down button on keyboard once. This should send all the face parts to the front. Use the Alt button and arrow key when using a PC.
Here's a video going over "Nudging" and how to deal with the arms.
If Nudging does not work, you have to place the cursor in the Camera view, then hold down the Option button and press the arrow down V on keyboard.
If it still doesn't work, you can do this instead. You will need to click on the + on each Face layer to open the position control. All the positions will be at 0. You will need to enter 0.001 on the Position: Pos z layer.
Doing this will bring the face part forward in front of the Head.
Once the Head is in control of the Face Features, you need to select the Head in the Layers list on timeline and add a peg to the Head.
Remember, if you haven't added a peg before, Harmony will ask you to change your Display option to Display All. Go to the Scene tab at the top, click and change Default Display to Display All. Then go back to adding a peg to the Head Layer.
Everything will be animated using the Peg Layer. DO NOT SET KEYS ON THE DRAWING LAYERS. THE PEGS CONTROL THE DRAWINGS, KEY THE PEGS.
Now the Head rotates above the Body/Neck. You can parent the Arms to the Body and the Hands to the Arms. And then we will Bone Deformers into the arms and legs in the next lesson.
Here's a great tutorial called Toon Boom Harmony Tutorial #06 - Intro. To Deformation
by Frank Summers. This explains how Deformers work for the Arms and Legs.
Here's an overall Harmony Tutorial
Did this help you? Any feedback can help us all, leave a comment below.
Did this help you? Any feedback can help us all, leave a comment below.


No comments:
Post a Comment