
Week 15
Monday: Final Day to review Final Project.
Wednesday: Final Presentation of Final Lip Sync Project
( :15 or :30 seconds)
Week 14
Pose to Pose animation test with Lip Sync Sound
Start Inbetweening: Remember Ease Ins and Ease Outs, Squash/Stretch, etc. FINAL WEEK to Revise Past Projects.
THANKSGIVING HOLIDAY
Week 13
V CTNX Weekend
Week 12
Storyboard or create an Animatic with temp sound to show your idea for your Final Project, including Lip sync, sound effects, copyright free music and presence track(s).
Strong suggested to create a puppet rig to animate with to keep character on model and ease with animating process.
ToonBoom has just posted the Learning Portal with plenty of tutorials to help you with animating in Harmony. Check out: Rigging 1 with Harmony Premium.
Be sure to stop by the ToonBoom booth at CTNX to learn more...
Week 10
Here is a link to a series of tutorials on Rigging in Harmony from Tracy Strong of Stylus Rumble
https://youtu.be/U3Kt6FJ8x_Y
Week 9
Lip Sync Assignment 01: Two Words "Oh Boy"
Establish a scene and a character in that scene. Set up a situation already in progress. Your character must act or react by lip syncing "Oh Boy".
You can add "Oh Boy" to your Take a Drink project, before your character takes a drink or after they take a drink.
Helpful
Lip Sync Links
https://animateducated.blogspot.com/2014/04/lip-sync-animation.html
https://animateducated.blogspot.com/2016/10/lip-sync-animation-2.html
https://animateducated.blogspot.com/2018/05/sound-recording.html
Week 6
Week 5
Character Rig ready to Animate
Assignment: Test out your Rig
Review Rig Tests
Lecture:Animating a Character Walk.
Using Reference Footage.
Assignment: P05 Personality Walk In (Sc01)
Week 4
Setting up your Cut-Out character.
Week 3
 tool, its properties and options appear in the Tool Properties view.

Cut Out Animation
This is what the audience sees...
Monday: Final Day to review Final Project.
Wednesday: Final Presentation of Final Lip Sync Project
( :15 or :30 seconds)
Week 14
Pose to Pose animation test with Lip Sync Sound
Start Inbetweening: Remember Ease Ins and Ease Outs, Squash/Stretch, etc. FINAL WEEK to Revise Past Projects.
THANKSGIVING HOLIDAY
Week 13
V CTNX Weekend
Week 12
Storyboard or create an Animatic with temp sound to show your idea for your Final Project, including Lip sync, sound effects, copyright free music and presence track(s).
Strong suggested to create a puppet rig to animate with to keep character on model and ease with animating process.
ToonBoom has just posted the Learning Portal with plenty of tutorials to help you with animating in Harmony. Check out: Rigging 1 with Harmony Premium.
Be sure to stop by the ToonBoom booth at CTNX to learn more...
Week 10
Here is a link to a series of tutorials on Rigging in Harmony from Tracy Strong of Stylus Rumble
https://youtu.be/U3Kt6FJ8x_Y
Week 9
Lip Sync Assignment 01: Two Words "Oh Boy"
Establish a scene and a character in that scene. Set up a situation already in progress. Your character must act or react by lip syncing "Oh Boy".
- Choose a wav file of "Oh Boy"
- Add sound file to Harmony scene
- Read sound and add correct mouth positions
- Animate your character gesturing, acting, etc.
- Show animation not a still photo with lip sync.
You can add "Oh Boy" to your Take a Drink project, before your character takes a drink or after they take a drink.
Helpful
Lip Sync Links
https://animateducated.blogspot.com/2014/04/lip-sync-animation.html
https://animateducated.blogspot.com/2016/10/lip-sync-animation-2.html
https://animateducated.blogspot.com/2018/05/sound-recording.html
Week 6
Review: P05 Personality Walk, revise, re-render
Lecture: Animating Acting: Scenes
IN CLASS: REFERENCE FOOTAGE
Assignment: P06; rough storyboard
Review: P06 Take a Drink and Resolution Storyboard
Assignment: Pose Test of Key Poses
Week 5
Character Rig ready to Animate
- Storing Master file into Harmony Premium Library.
Assignment: Test out your Rig
Review Rig Tests
Lecture:Animating a Character Walk.
Using Reference Footage.
Assignment: P05 Personality Walk In (Sc01)
Week 4
Setting up your Cut-Out character.
- Head pivots with facial features
- Set up Bone Deformers for arms and legs, (inside body optional)
- Drawing Substitutions
- Master Peg Setup for Animation and Storage.
Week 3
To rig a Character in Harmony, you'll need a 3/4 pose.
Click this link to learn how to set up your character rig.
 Anim203_F1 and _F2
For Monday: Have all the Body parts cleaned up and in color
on separate layers.
Click this link to learn how to set up your character rig.

For Monday: Have all the Body parts cleaned up and in color
on separate layers.
Label each layer,
Adjust Pivot points for Head and add face parts,
Adjust Pivot Points for Arms and Legs.
We will be going over Bone and Curve Deformers and you
will Rig the Arms and Legs of your character in class, so
please have everything setup before hand.
Anim203_F3
Same as Above, DO NOT PEG LAYERS or Delete PEGS.
I will show you how to fix this in class.
Here's a good example of a Character Take (reaction)
This explains how to set up a simple arm with hand.
Part 2: Arm B
Here is a tutorial about rigging arms and nudging a layer.

Drawing with the Brush or Pencil Tool
The Brush  and Pencil
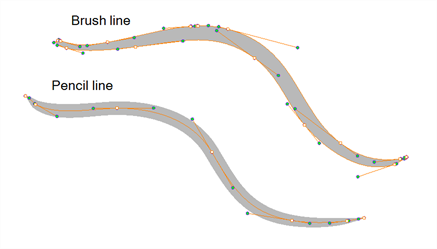
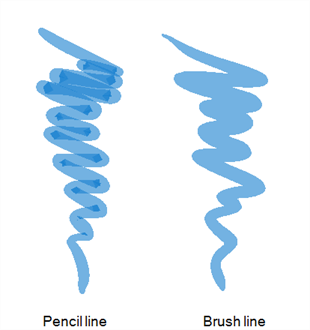
  tools are used for drawing and sketching. Both tools support pressure sensitivity, allowing you to create lines with variable thickness. The Brush tool produces contour vector lines. The Pencil and shape tools produce central vector lines. This means that a pencil line’s control points (used to deform its shape) are located along the length of the central spine, while the Brush line’s control points are located along the contour.
| • | If you draw with the Brush tool and want to modify the thickness variation, use the Contour Editor |
| • | If you draw with the Pencil tool and want to modify the thickness variation, use the Pencil Editor |
| • | You can also convert a brush zone into a pencil line with the Brush Stroke to Pencil Line |
If you sketch a drawing using a semitransparent colour to get a paper-like feel, you should use the Brush tool as it produces a more realistic and natural feel. The pencil line is very useful for tracing clean or final drawings.
Also, it is recommended to use brush lines when designing cut-out puppet articulations which use patches.
Cutter Tool Options
When you select the Cutter
Harmony 15: Keyboard Short Cuts
Shortcut Windows Mac
Add Frame
after selection
Ctrl + H Command + H
Add Frame
before selection
Ctrl + G Command + G
Copy Ctrl + C Command + C
Cut Ctrl + X Command + X
Paste Ctrl + V Command + V
Delete DEL Backspace
Delete All Esc
Duplicate Drawing Alt
+ Shift + D
Free Pan & Zoom Spacebar
Increase Exposure (Frames) +
Decrease Exposure -
Last Frame >
Next Frame . Period
Previous Frame , Comma
Preferences Ctrl + U Command + U
Save Ctrl + S Command
+ S
Cut Out Animation
This is what the audience sees...
Rapunzel fananimation from maginpanic on Vimeo.
This is what the Animator uses to animate the character rig.
TIP: If you add a peg to your drawing and it gives you a
Display All request instead, do the following.
Display All request instead, do the following.
Go to Scene tab/ Default Display and click Display All.
Now Peg will be seen and will be attached to your drawing.
Ignore this Tip for now
TIP: Shift+F11 should work if you have the right peg selected
and your cursor is in the camera view. If that doesn't work
you can go to view > show > control That will also show if
the hotkey is set up properly. If you have the peg pivot offset
the spline thingy will be offset as well - so that may be why
you're having issues. Make sure you're starting with a fresh
peg that isn't chained to anything and you shouldn't have
any issues. If it purists, it could be a software problem.
No comments:
Post a Comment